I’m going to start this post off saying that I am real bad at keeping to a routine. Truly. My last post on this site was in April, and it is now nearly the end of July. In that time, I feel as though I have made a ton of progress on learning both Blender and Substance Painter, and, as can be seen in the semi-self-congratulatory title, I managed to get a couple of my assets into a web show on Twitch called Ascension Academy. The rest of the models I have made thus far have been for a spinoff of said web show that my friend is trying to get started.
The Medical Kit
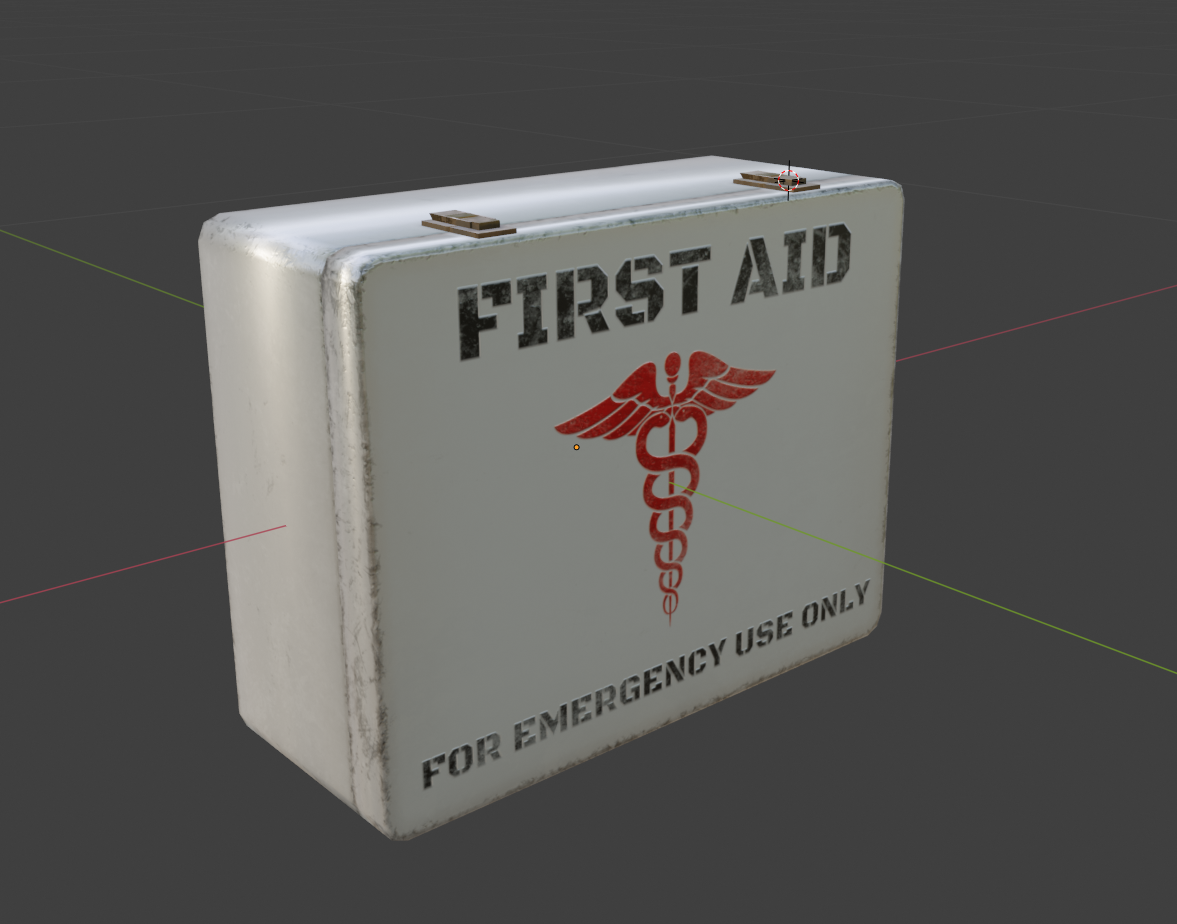
This first model on this post is a World War 2 x Dungeons & Dragons crossover inspired medical kit. In fact, this is pretty much going to be the theme of this post as both Ascension Academy and the to-be-named spinoff show are both set in this sort of universe.
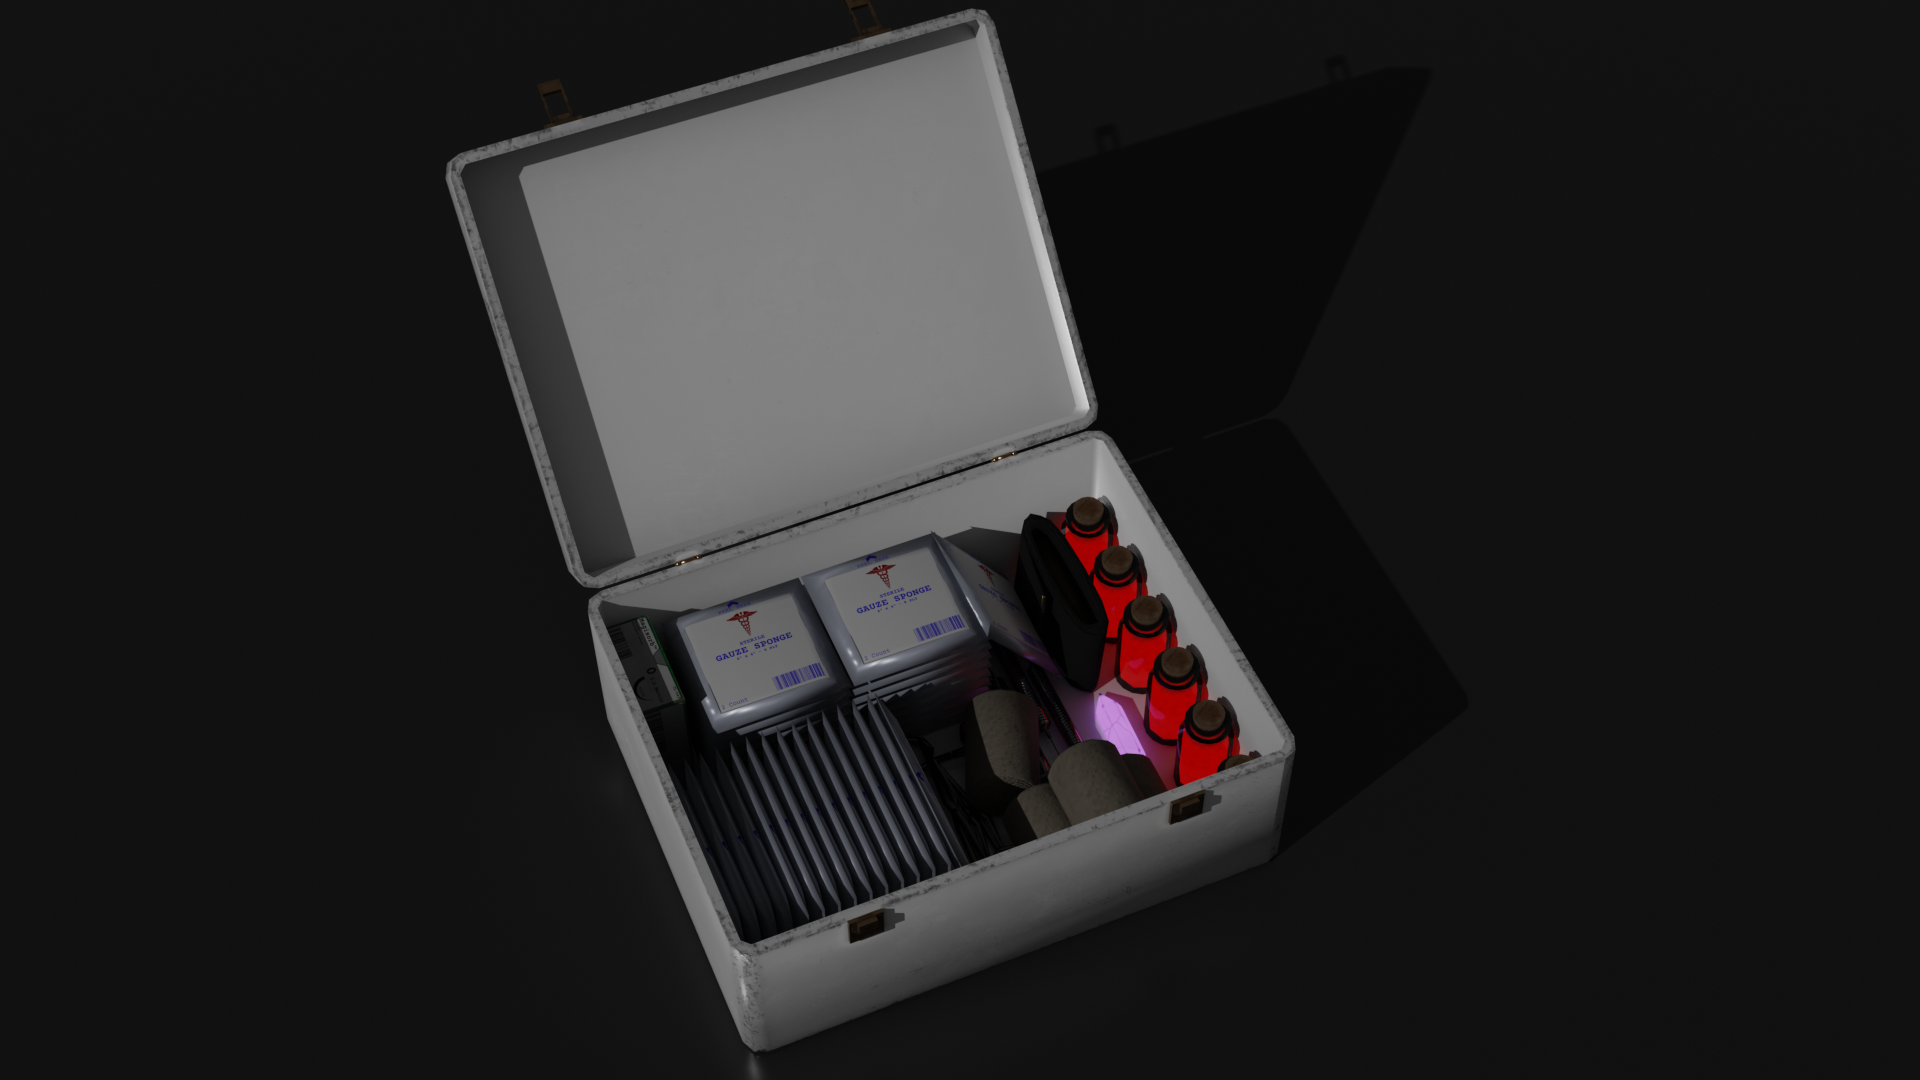
The first bit that was made was, of course, the shell. Simple box modeling with some beveling, the hardest part was making the latches and hinges not look completely bad (though I do believe they could be a lot better). The second was obviously everything else inside the kit. These were all built with polycount and batching in mind, so every object in the kit is less than 400 polygons and shares the same texture. The heaviest model is the syringe, clocking in at 392 polys.
Unfortunately, because of the transparency of the syringe and potion phials, two materials were needed, which makes them somewhat less efficient. This was because I didn’t want to use Cutout transparency, and having everything on a transparent material makes the opaque stuff render in the wrong order, ending up looking inside out.
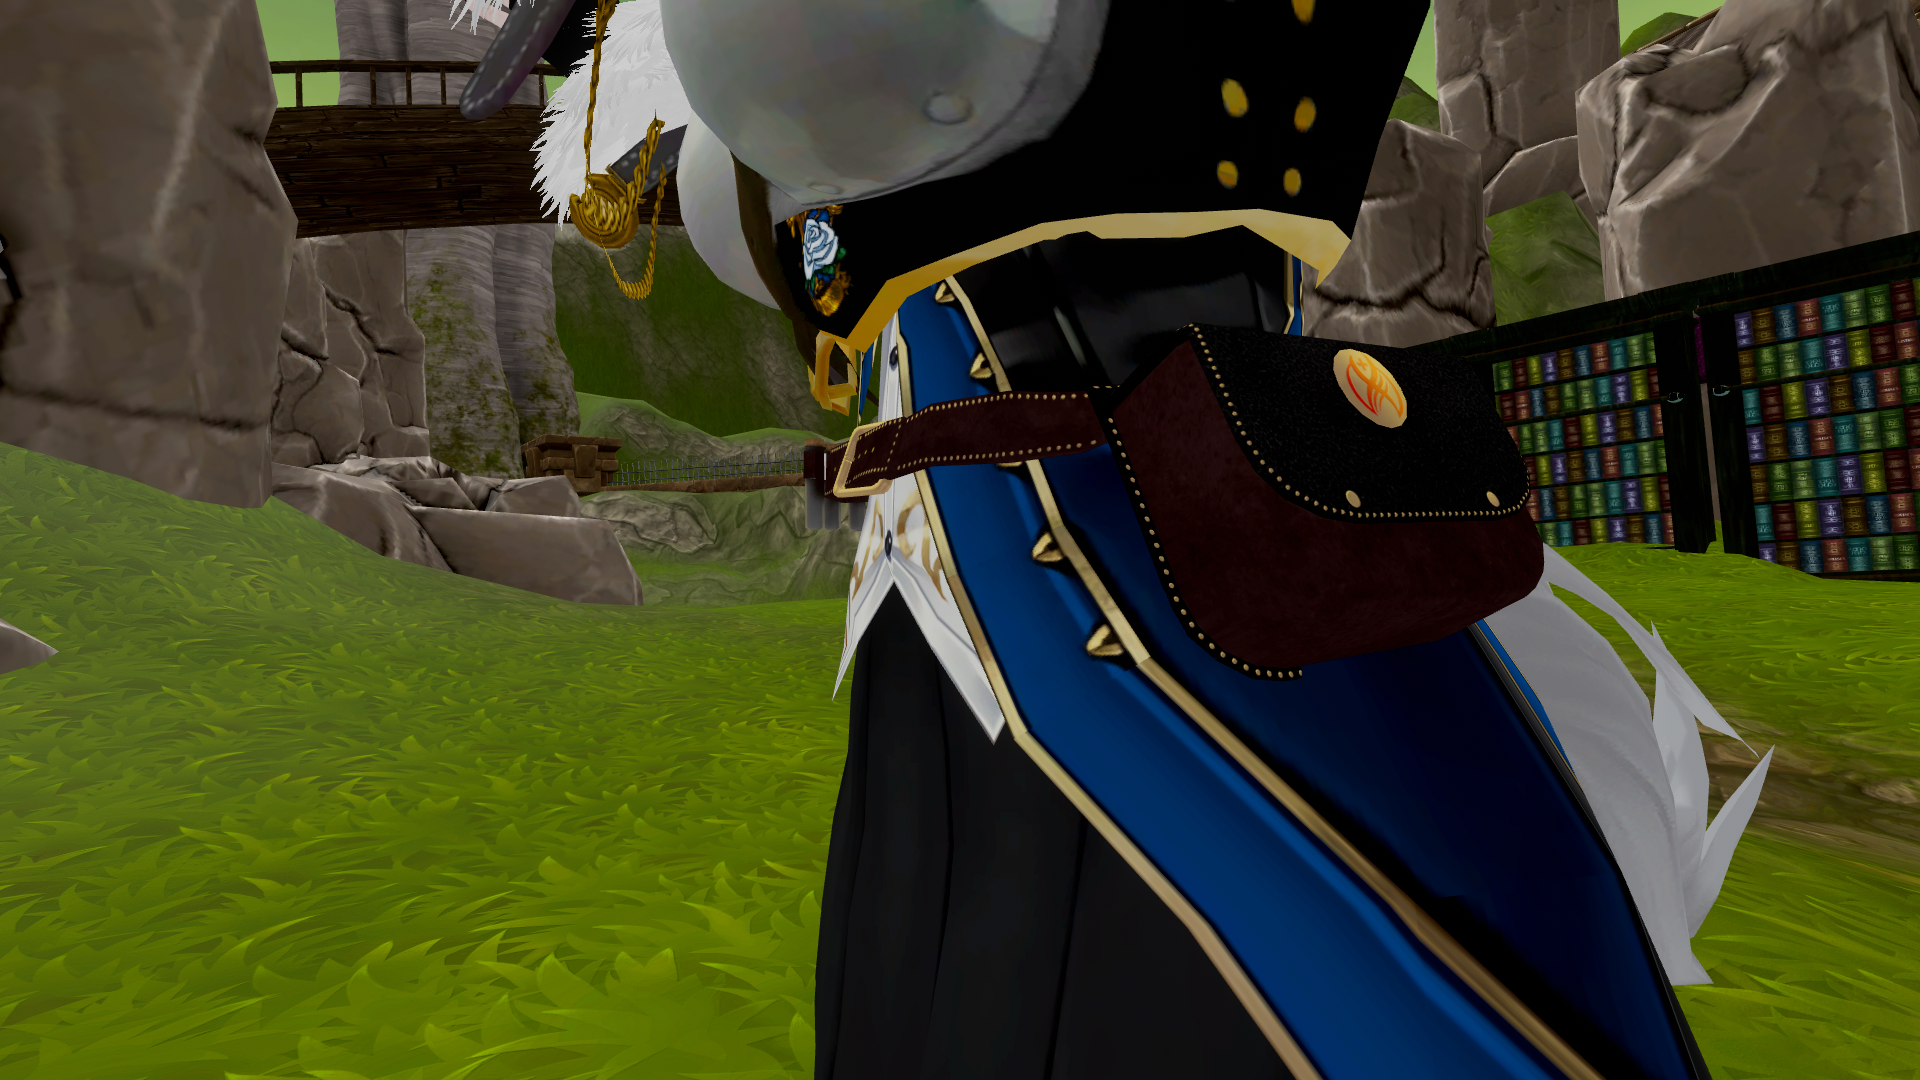
The Medical Pouch

This Medical Pouch was made in response to someone commenting on the previous medkit model set, asking if I had a wearable version in the same vein. I did not, but that just made me want to fill said gap. So I got to work in Blender and whipped this model up in about a day, surprising myself. All in all, it’s a pretty simple model, so I guess I shouldn’t be too surprised, but I’m still very much learning.
The most annoying part of this model was the transition between Belt and Pouch, and even now I’m not entirely happy with it. I also cheaped out on the belt buckle, opting to just paint the retainer pin on in the normal map instead of making it out of geometry. This is only really noticeable if you’re looking for it, but my laziness definitely degraded the quality slightly, even if it saved a couple polys.
However, as previously mentioned, a couple of these assets made it into Ascension Academy. This was one of them. I handed it off to the streamer who plays “Lila” on the show (Bandaid91), and it ultimately ended up on her “Winter Armor” model.
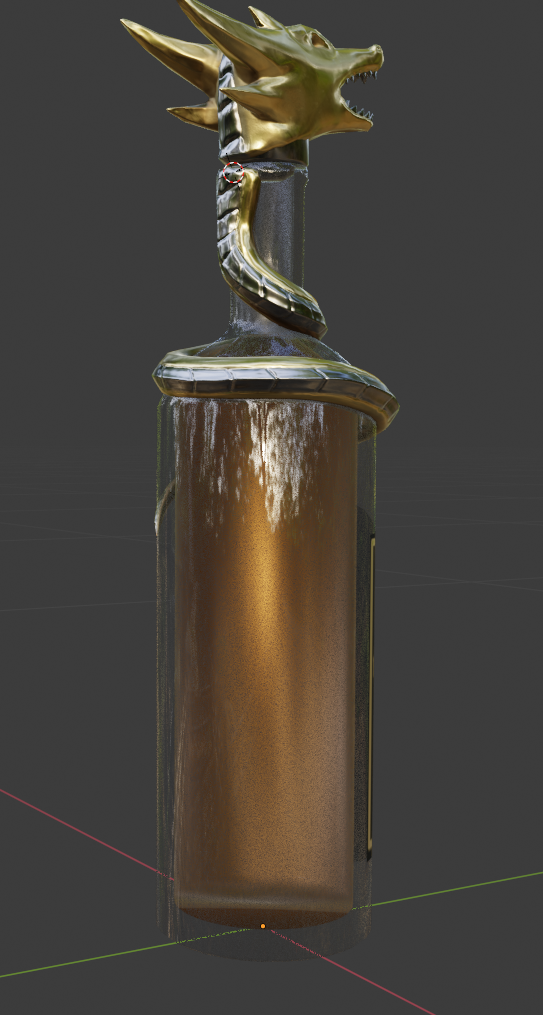
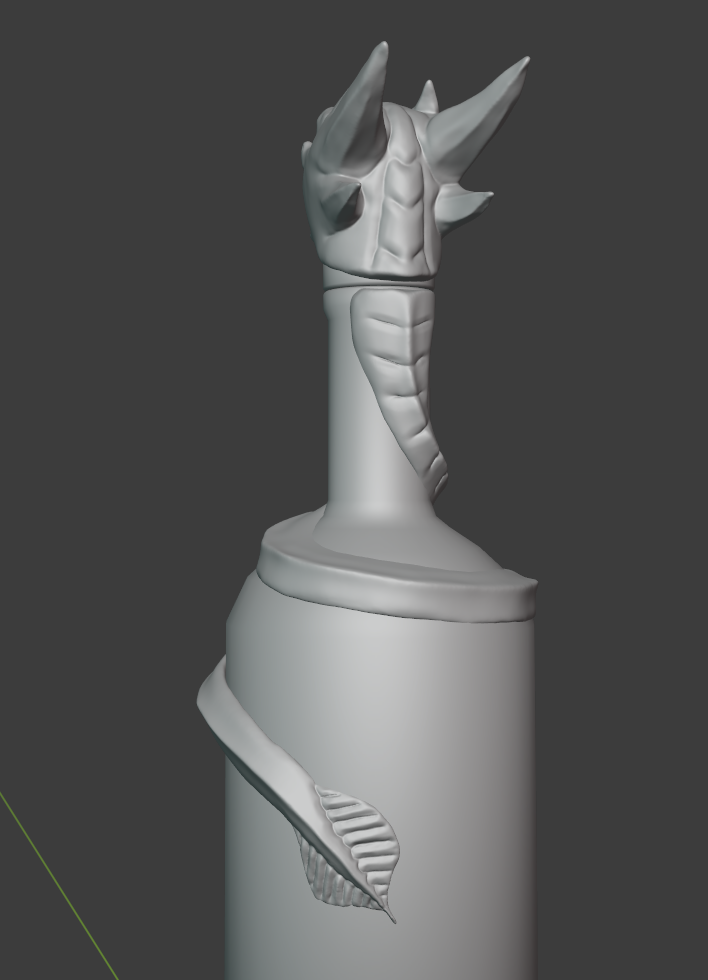
Dragon Water
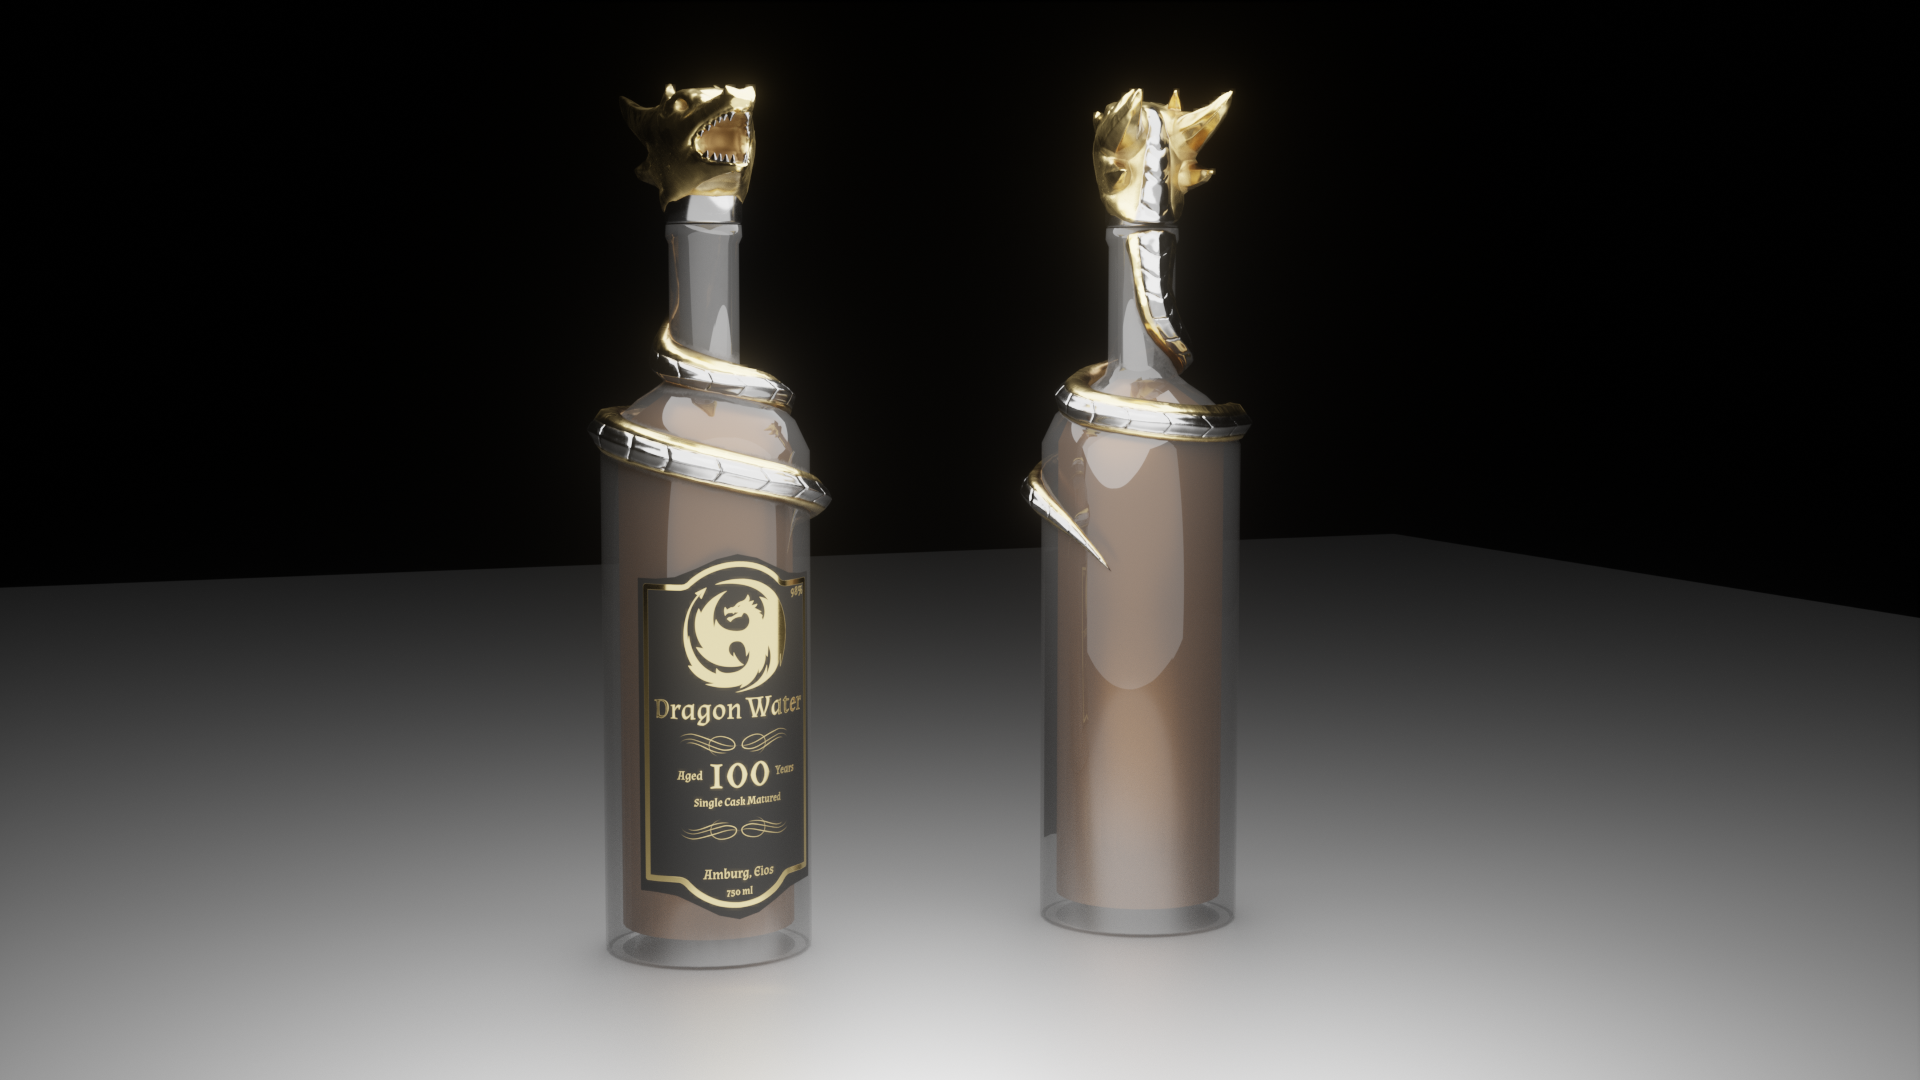
Now for the longest and best part of this post (at least in my opinion). Now, I don’t really like the name “Dragon Water”, but this model is based on a canon drink from the Ascension Academy show that didn’t have a model associated with it. Dragon Water is supposed to be extraordinarily expensive, said to be “more than the worth of a man”. It wasn’t explicitly a “human” drink, so I embellished a bit and implied that the liquor aged like whiskey for longer than a human lifetime. This was also one of my longer duration single-model projects, clocking in at approximately 70 hours of work overall.
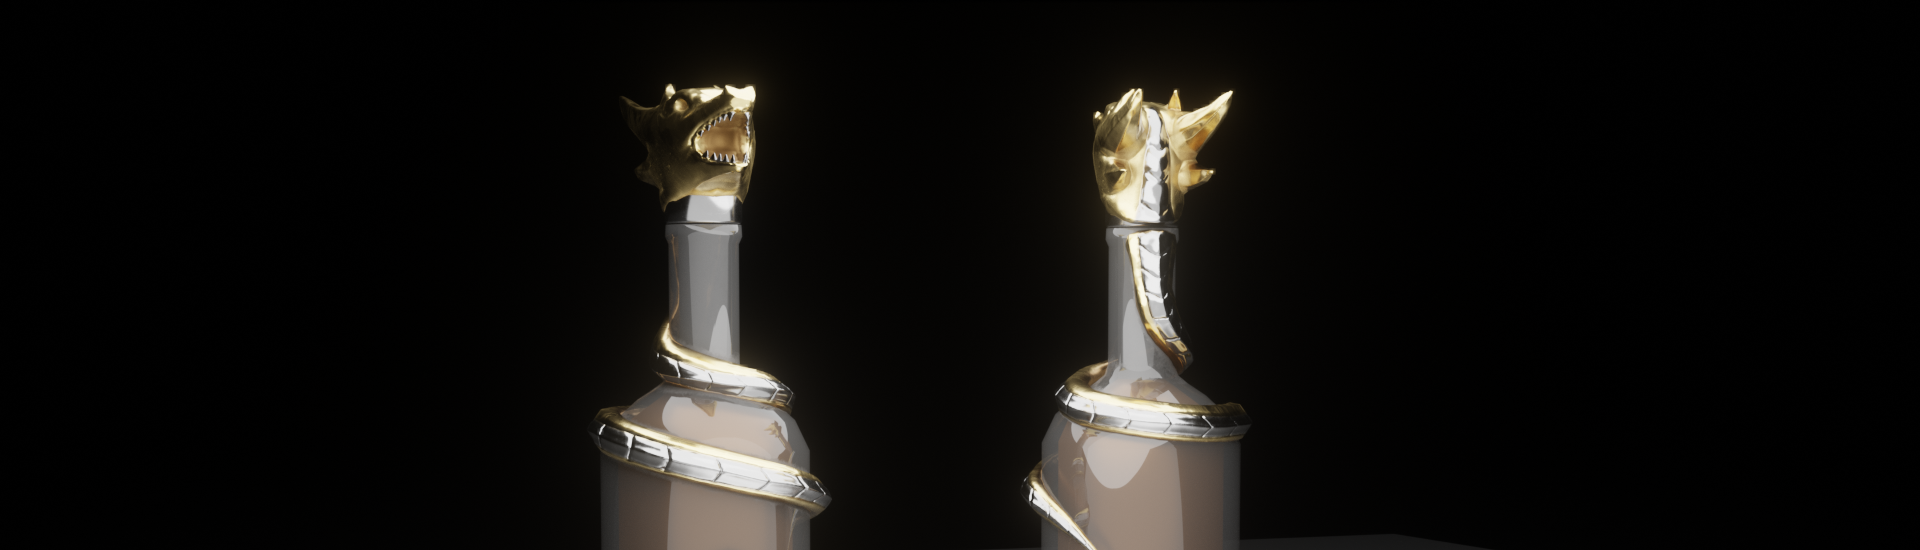
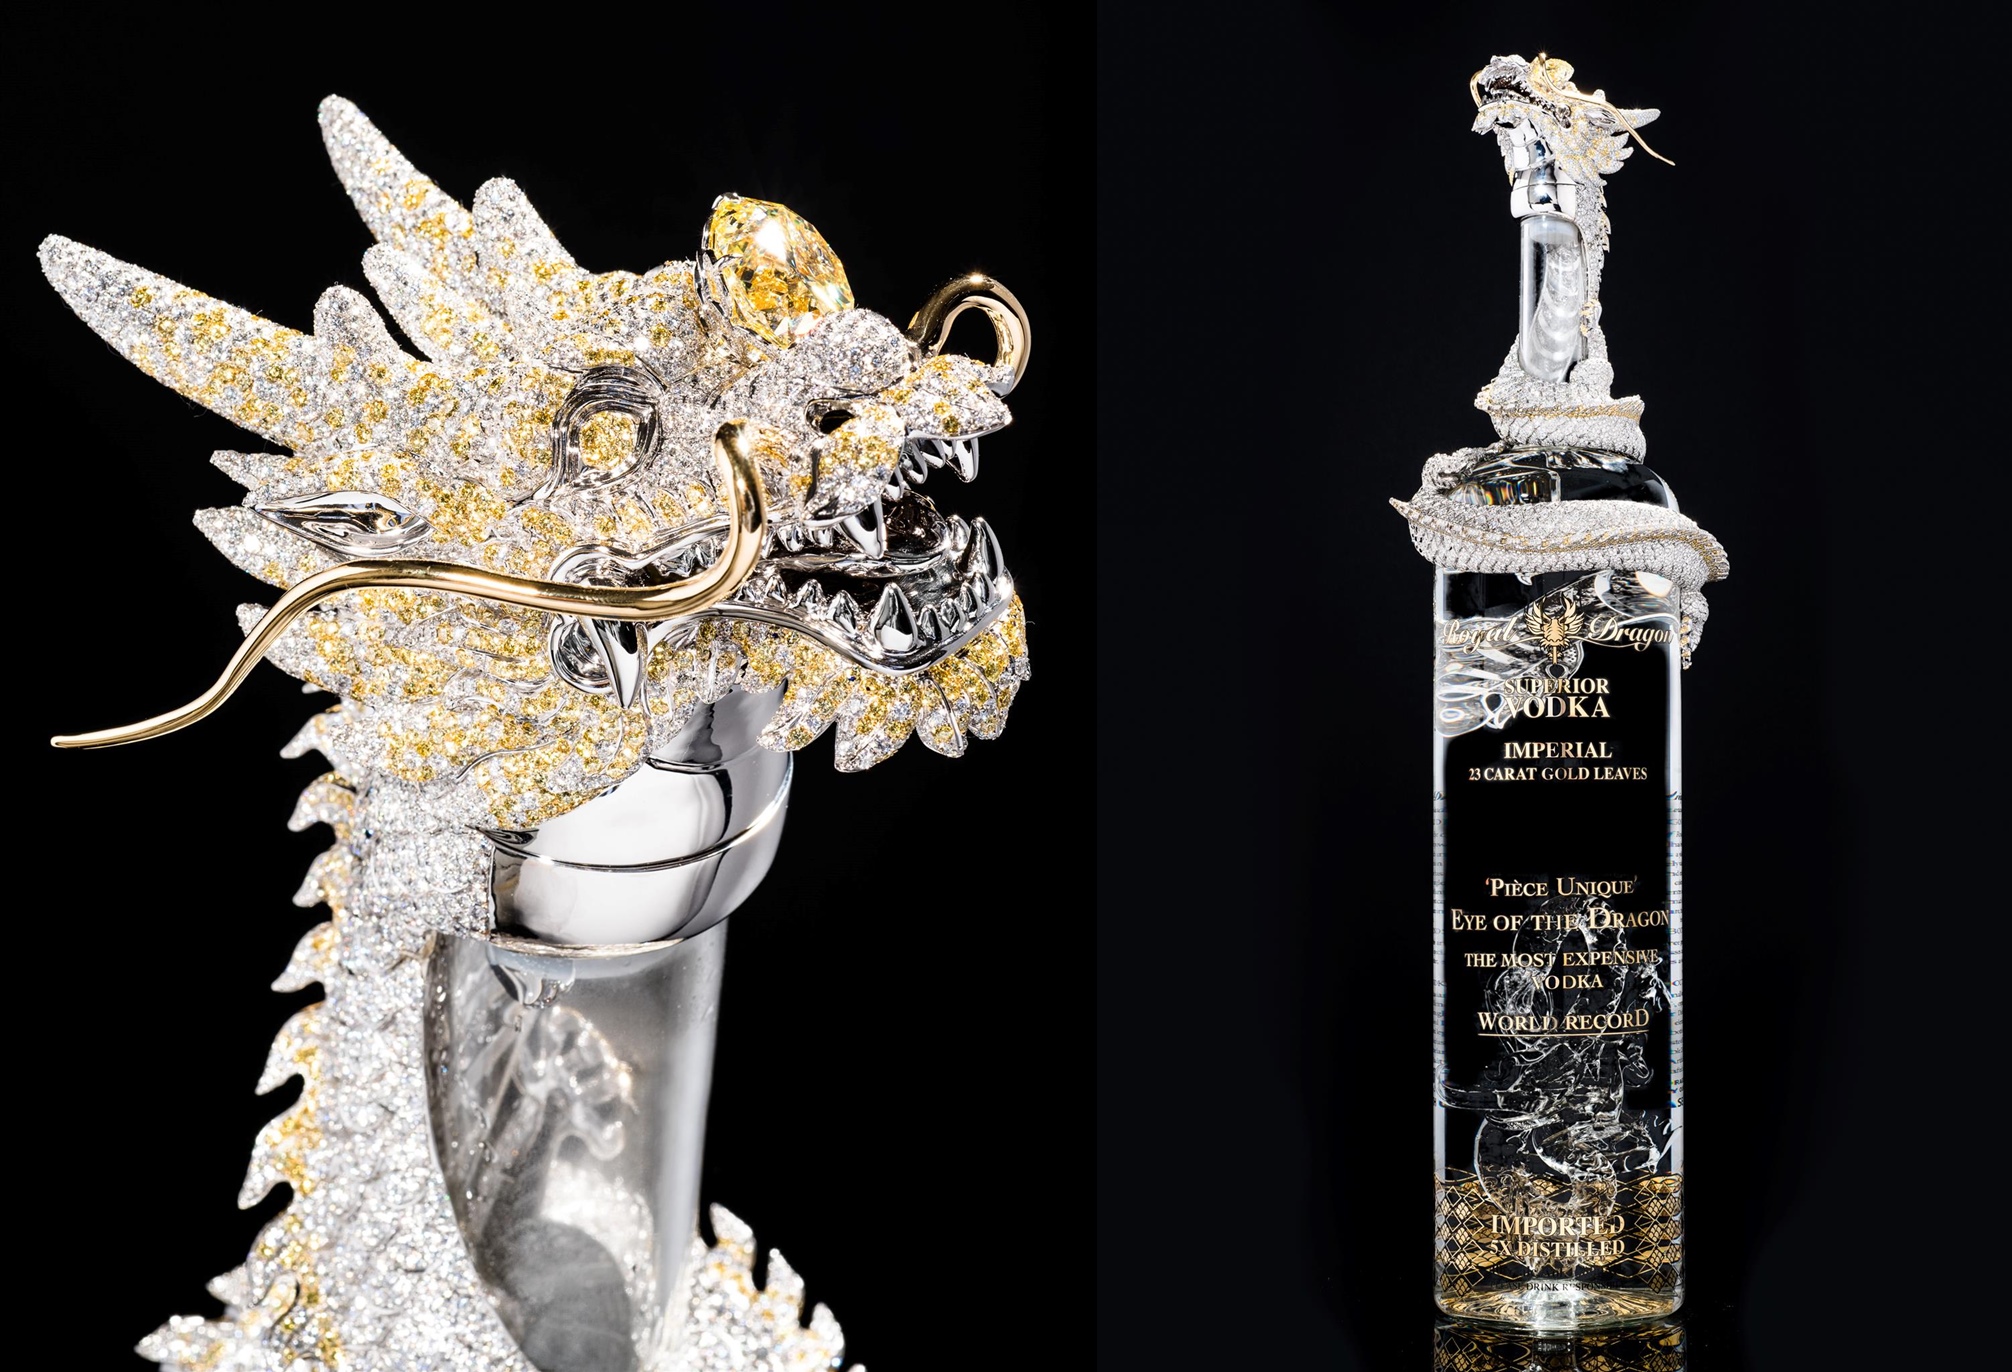
This model was inspired by the “Eye of the Dragon” Vodka coming in at $5.5 million. You can see the inspirations quite clearly in the reference image below. However, I went with a more “western” styled dragon head, since that would fit better with the “Eiosian” theme (the nation from the aforementioned show). Also I couldn’t get the Eastern-styled dragon bits looking right. Just as well, I toned down the polycount significantly by not bothering to sculpt the spinal spikes and just went with a plated look.
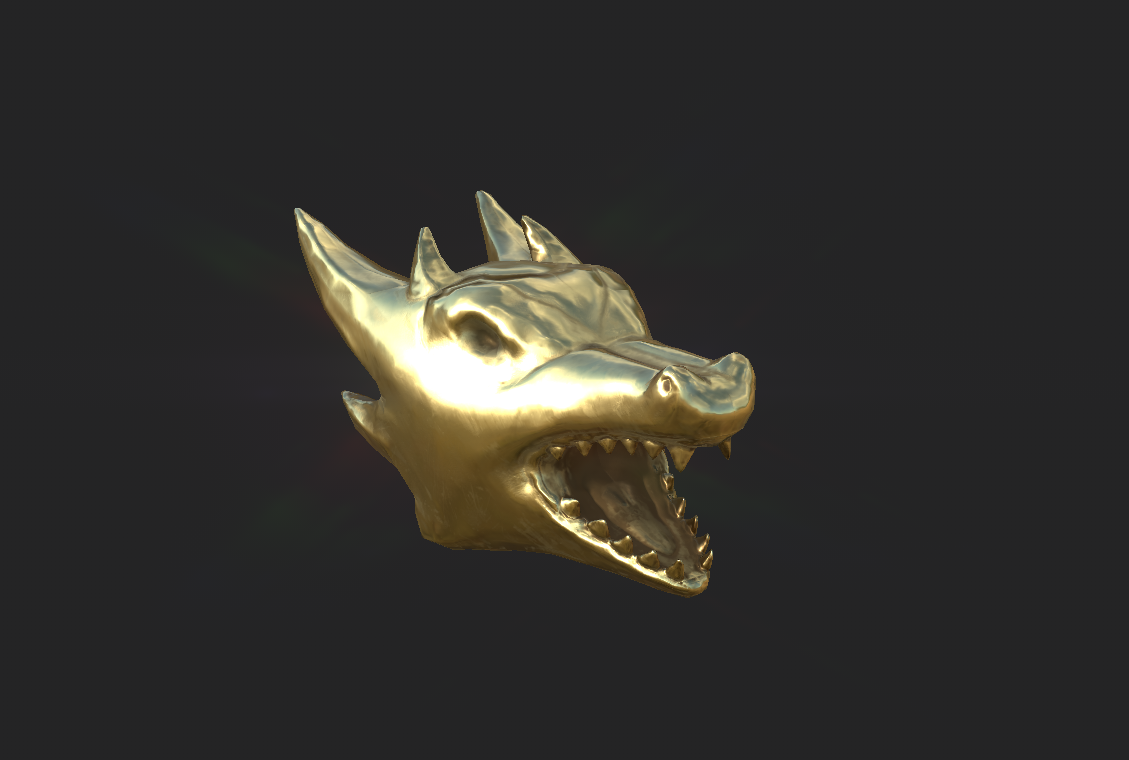
This was my first attempt at playing around with the Sculpting Tools in Blender, and I really do like the way it turned out! However, this took a couple tries to get right, with one revision looking more like some weird tadpole rather than a dragon.
The base bottle was the easiest part, of course. Basically just some cylinder extrusions. The head was actually what I sculpted first. Starting with a subdivided cube and taking a few missteps with the sculpting stuff, I eventually got a decent high-poly base. Though I have to say that the teeth were the most annoying to get right.

From there, it was all about learning how to retopologize (retopo) the head in an effective manner. Once again, the teeth were the most infuriating part. However, after fiddling with quads and poles and not knowing what the heck to do to keep the topology sane (even trying one of those Auto Retopo tools to little success), I managed to get the polycount down from 254k to 1.2k. Probably didn’t need 254k on the highpoly, but I wasn’t being exceptionally careful with the sculpt resolution.
So I baked the Normal Map from the highpoly onto the lowpoly and threw the head into Substance Painter to see if I could input a custom Normal Map and have all the Curvature and such work with it and ultimately export back onto the material. It did, huzzah! Layer Anchors are great! But then I got myself into the Post Processing menu and nearly blinded myself.

After a quick tone-down of the Glare filter, it looked actually passable at a much lower polycount.
Next, it was onto the sculpting of the tail. I took a minute to learn how the Curves objects in Blender worked for creating tubular geometry and immediately went overboard to ill effect. This was the aforementioned “tadpole” iteration that was ultimately scrapped. The “fill” curve was much more convoluted and flat than it needed to be.
After 6 hours of pissing about with the sculpting tools and getting nothing looking good, I decided to just dodge the Sunk Cost Fallacy and dump the whole thing in a bin. And it DAMN well benefited from me doing so!
I replaced the “tapeworm” fill curve with a simple circle, and found the Taper Curve controller component very useful (the previous iteration was just me sculpting the taper manually). This immediately looked so much better, and only required me to push the interior side of the tail out of the inside of the bottle. From there it was just down to sculpting the plated spine, which went easily enough. The retopo for the tail was significantly easier than the head, as it was basically just a spiral. Baked the Normals and threw the lot into Substance Painter.
In Substance Painter, I think the part that came out simultaneously the best and the worst was the label. It’s a physical model rather than a drawn-on texture, as the need for transparency on the bottle would have make it render all wonky. This, unfortunately, can be seen in the polygonal edge of the label. Fortunately, the label itself hides it decently well by drawing the eye to the free Dragon icon I found online and to the gold-leaf bordering. I couldn’t find any free filigree for the fillers on the label online, so I took to Photoshop to whip up something manually using curves.

Another issue I found is that the Normals for the tail were all sorts of screwy (though I didn’t get a screenshot of it). I had to part the tail into several sections to get it to sanely fit on the UV map without distortion, but those seams were VERY apparent, and sections of the tail were rendering their Normals “backwards” (dips instead of peaks, etc). It turns out, Blender is expecting the “OpenGL” format for Normal Maps, but Substance Painter by default spits them out as DirectX mode. Simple flip in the exporter and that was fixed.
Finally, as can be seen from the title card, I threw the resulting model and materials into Cycles and setup a rudimentary scene. It looks amazing (again, in my opinion) for my skill level at first, but Cycles didn’t take too kindly to the inverted-face “liquid” part of the model, turning into something akin to chocolate milk. In Eevee and OpenGL mode, it looks a lot more convincing.